How to Build Flutter App for any WordPress Site
Leaving a perfect digital footprint is crucial for brand growth. However, you may be here to find the optimal balance between mobile engagement and web traffic. It’s possible and typical to build a Flutter app for any WordPress website. We do that how? This blog is about it.
WordPress and Flutter are known for their effective software solutions for businesses and brands. WordPress’s flexibility and Flutter’s UI toolkit are ideal for magic.
WordPress leads the industry with a 62.6% market share. Building a Flutter app for one of its websites can add functionality without sacrificing quality.
How to Build a Flutter App for Any WordPress Website?
We discussed the many benefits of Flutter app development. Thus, let’s immediately construct a Flutter app for your WordPress website (great!).

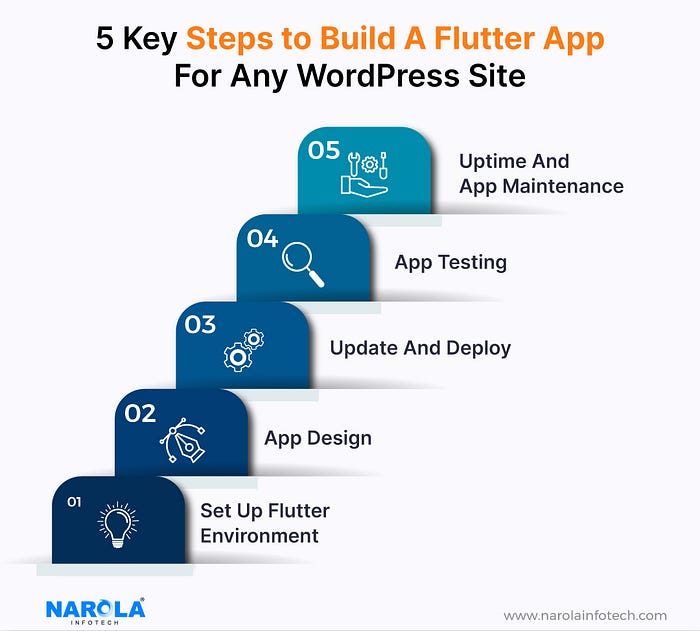
Step-1 Flutter Environment Setup
Flutter setup is simple and essential. Flutter supports Windows, macOS, and Linux. Let’s begin!
1. Pick an OS
First choose Windows, macOS, or Linux. It must meet Flutter’s system requirements as described.
2. Install Flutter
Next, we download your OS-specific stable release from Flutter’s website. Developers unzip and place downloaded files in your system.
3. Setting Flutter’s Path
For seamless Flutter command access from any terminal or command prompt, the team integrates the Flutter SDK into your system’s PATH variable. Imagine having a Flutter wand at your fingertips!
4. Support Tool Assembly
Git or the Android SDK may be needed for Flutter, depending on your OS. Installation of these tools is smooth.
5. Check Installation
Type ‘flutter doctor’ in a terminal or command prompt. This command verifies Flutter installation and finds missing dependencies.
Installing Libraries and Plugins
Before integrating Flutter, make sure your WordPress site has the necessary plugins — the unsung heroes that keep everything running smoothly.
First, we check that WordPress has Rest API, JWT Authentication, and Regenerate Thumbnails. These connect your WordPress backend to Flutter, enabling smooth communication.
The next step is installing Flutter for WordPress or editing the child theme’s functions .php file. This is necessary to align WordPress with Flutter.
After installing these plugins and libraries, we can develop a Flutter app with WordPress integration. This method lets us use WordPress’s powerful CMS to create a native-like experience across platforms.
Building a Flutter app for any WordPress site starts with plugin and library installation. Make sure Rest API and JWT Authentication are installed and integrated with Flutter for WordPress to give your users a uniform and easy experience.
Building a WordPress-Backend Flutter App
The “Easily Generate REST API URL” plugin will boost your WordPress site. This utility quickly provides a REST API URL to seamlessly integrate your Flutter app with the powerful WordPress backend.
Flutter’s straightforward design toolkit and engaging widgets let developers build a great app on time.
After the design is perfect, link the Flutter front end to WordPress. The given REST API URL is used.
We use Flutter_WordPress for smooth integration. It works like a magic wand to make Flutter-WordPress interactions smooth.
We guarantee a faultless performance before your app shows up. To ensure app-WordPress compatibility, our team does extensive tests (primarily in Android Studio).
Step-2 App Design
Flutter apps for WordPress sites need great design to provide a great user experience. Luckily, Flutter design templates offer many options to give your app the perfect appearance and feel.
These templates include pre-made UI elements you may alter for your project. They encompass simple structures to complicated interfaces, saving time and making your app appear great. Customization helps develop streamlined designs.
Flutter developers can easily match WordPress site identity using colors, fonts, and styles. Consistency across platforms improves app design and use.
Consider app design a great party. Familiarity and intuitive cues make users feel at home. Having a native-like app is like knowing where to relax and converse.
A pleasant digital habitat is created by following design principles and using familiar UI elements. Details — decor, tone, and ambiance — make the magic. Flutter’s design templates let you customize your app.
Flutter’s toolkit and familiarity create a beautiful and comfortable app. Building a WordPress Flutter app requires this.
Adding Widgets
Flutter apps for WordPress sites need widgets in the Build (BuildContext context) function to customize their interfaces. This ensures a beautiful design and a great user journey.
To represent posts as landing page cards, use the FutureBuilder widget. It dynamically displays posts from the WordPress backend. FutureBuilder lets developers construct attractive cards with article titles, featured photos, and descriptive previews.
This card list is retrieved using ListView.builder(). This powerful utility effectively generates dynamic cards from fetched data in a scrollable list.
If your organization chooses Flutter mobile app development, consulting a seasoned development partner like us is best. Custom Flutter apps that feel native across platforms are their specialty.
Create Custom Widgets and Components Lib Folder.
A well-structured code base improves efficiency and scalability. Creating a “Lib” folder for custom components and widgets works well.
Create a “Lib” folder in your Flutter app:
Open your project in your choice code editor or IDE (e.g., Android Studio).
The code is in the “lib” folder in your project directory.
Choose “New Folder” from the “lib” folder option when right-clicking.
Name the folder “Lib” or whatever you want and press Enter.
Flutter has created a “Lib” folder.
Custom components and widgets can now be organized in this folder. This simplifies project administration and navigation.
By creating a “Lib” subdirectory, developers can simplify and reuse code. This ensures a uniform user experience across platforms, making development easier.
Use REST API URL to link frontend and backend
Your Flutter app’s front end will smoothly connect to WordPress’s back end using the REST API URL. A brief guide:
Install and activate the “Easily Generate REST API URL” WordPress plugin to easily build the URL.
Check the plugin settings for the produced URL.
Go to your Flutter project’s code with this URL.
To make HTTP queries and receive WordPress backend data, add the REST API URL to the build(BuildContext context) method of the widget in the ‘lib’ folder.
Data movement between your app and website needs frontend-backend integration for a consistent user experience. The REST API URL lets your Flutter app dynamically display WordPress backend content, improving functionality and user engagement.
Step-3 Update/Deploy
Success depends on keeping your software updated and deploying it easily across platforms. Flutter streamlines app updates and deployment. Flutter makes it easy for developers to add features, correct issues, and improve functionality.
Developers simply alter codebase components and use “flutter build” to update your program.
The same codebase should be used to deploy the app to iOS and Android after making and testing the necessary adjustments.
Flutter’s hot reload functionality allows fast iterations and upgrades while preserving a consistent user experience across platforms. It also automates deployment with a seamless interface with popular CI/CD technologies.
Step-4 App Testing
Flutter apps for WordPress sites must be thoroughly tested before launch. Most important for reliable mobile app testing:
1) Functionality Testing:
This checks user registration, login, content retrieval, push alerts, and custom features for smooth functioning.
2) Compatibility Testing:
Test software on several devices, Android and iOS versions, and screen resolutions. This ensures consistent performance across settings.
3) UI/UX Testing:
Assessing platform-wide design consistency. The quality assurance team must test navigation, button functions, form inputs, and screen transitions for responsiveness and beauty.
4) Integration Testing verifies app-WordPress backend integration.
Verify data retrieval and display. Make sure your REST API plugin works for secure connections.
5) Performance Testing:
Your software is tested under low network connectivity, high traffic, and concurrent usage. We measure reaction time, loading speed, and data handling efficiency for a pleasant user experience.
These procedures are a reliable way to find and fix bugs before app release. Your Flutter app needs a dependable and engaging user experience to succeed.
Step-5 App Uptime + Maintenance
Flutter apps may benefit from Firebase Console integration. You can easily monitor app performance and handle push alerts with its tools.
Setting up Firebase Console for your Flutter app on any WordPress site is easy:
Create a Firebase Console project and activate Firebase Cloud Messaging (FCM) to send push alerts to app users.
Flutter app Firebase SDK integration: To use Firebase services and APIs in your project, add the dependencies to pubspec.yaml.
Deal with notifications: Setting up Flutter Firebase Messaging listeners and callbacks to manage push notifications and device token updates.
Control notifications: This makes alerts easy to utilize by integrating them into your app’s interface using Flutter’s framework.
Keep track of app performance: Crash reports, performance data, and user engagement should be monitored regularly using Firebase Console. Developers find and fix app uptime issues.
This ensures a reliable Flutter app experience. Manage push alerts, monitor performance, and maintain a consistent user interface to improve user experience.
Build a Flutter App for Your WordPress Site
Building a Flutter app for any WordPress site boosts success and user experience. Mobile apps allow you to collect client data and deliver personalized services or engagement. Their access to your brand increases its chances of making an impression. Finding a reliable development partner is just as important.
Read More: Build Flutter App for any WordPress


Please login or create new account to add your comment.